Using Mailchimp to Email Your RSS Feed (Blog Post Feed)
Depending on who you ask, you should either always or never email your blog posts (or, as they say in the biz: RSS feed). Since I don’t know you, but I assume you’re an intelligent person because you got this far, you’re reading this because you have already decided you want to email your blog posts to your subscribers.
MailChimp is more than happy to do this for you and do it for free. With MailChimp you can:
- design the blog post email that goes out (header, side bars, etc.)
- personalize it so it says, “Dear Joe”, instead of “Dear Occupant”.
- pick your content layout
The email marketing term for sending emails to your subscribers is often called an email “campaign”. (as in a “marketing campaign”). Usually you launch an email campaign to sell or promote a product or an event or whatever. You get these all the time from other people in your own inbox.
MailChimp refers to your blog post feed as an “RSS feed”. Therefore, what we will set up here on MailChimp is called an RSS Campaign. And it will be automated so that an email will go out to your subscribers each time you publish a new post.
So let’s just jump right in already, ‘kay?
Login to MailChimp
Go to MailChimp.com and click on the Log In link (check the upper right hand corner).
Enter your login credentials (username and password).
Create a Campaign
Then, in the upper right hand corner, click on Create Campaign.
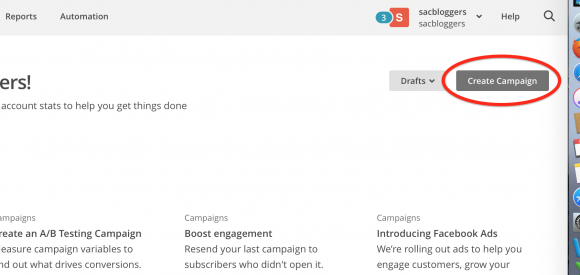
A dialog box will pop up for you to fill out the name of your campaign as well as selecting the type of campaign you are sending.
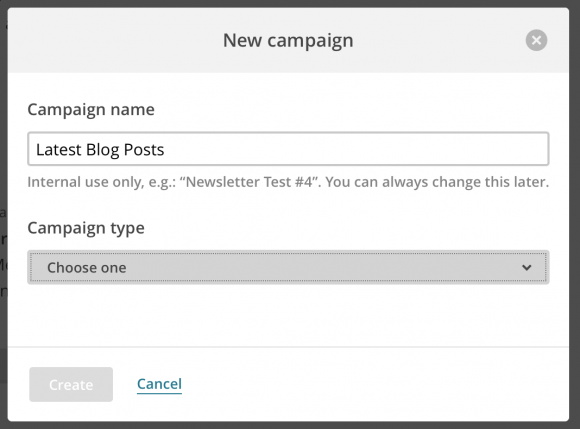
Enter the Campaign name
You can name your campaign anything you want – no one but you will ever see it, so make it meaningful for you. May I suggest “Latest Blog Posts” or “RSS feed” or something like that. Give it a name that you will recognize when you look at a list of all the campaigns you might create.
Select Campaign type
Since a blog feed is also know as an RSS feed, click on the box under “Campaign Type” and choose “RSS” from the list.
Then click the Create button. This will take you to the RSS feed and timing page.
RSS feed and send timing
Under RSS feed URL, enter the URL for your RSS feed. If you don’t know what it is, enter the URL of your blog and MailChimp will try to figure it out for you.
RSS feed
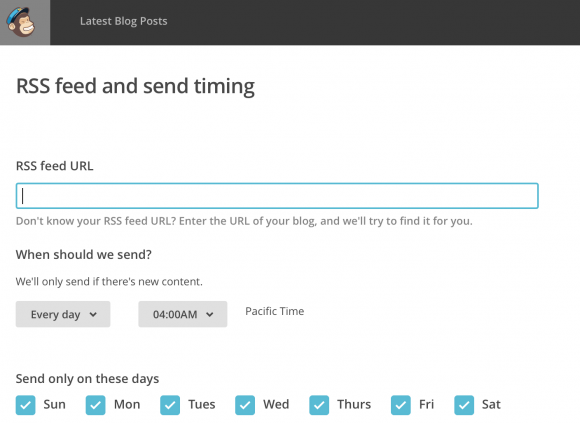
If Mailchimp can’t find it, refer to my tutorial on “How to Find Your Blog Feed URL“. Make sure there are NO SPACES in this field. I entered “stickyreaders.com” and my stupid computer kept trying to autocorrect and add a space between “sticky” and “reader”.
Send Timing
Under “When should we send”, select the timing you want your blog posts to go out.
Don’t let this whole thing get confusing for you. No matter what timing you choose, MailChimp will only send out new blog posts once.
For example, if you are a typical blogger and you don’t care if your blog posts are emailed on the weekends, then select “Every day” and “your preferred time of day” and check all the days of the week. It’s exactly the way I have mine set up and I’ll bet 93.5% of bloggers have it set up that way.
If it confuses you at all, perhaps it would be more clear if instead of asking, “when should we send?”, it should say, “when do you want us to check your blog to see if it has a new post and if it does we will send it?”
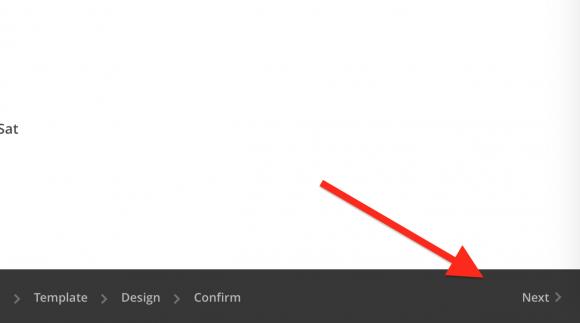
When you’re done agonizing over it, click on NEXT (probably way down in the bottom right of the page)
This will take you to…
Select List
Select the email list you want your blog posts to go. Don’t have a list? Then why on earth are you here??? There’s no point in emailing your blog posts to a list of people who have not subscribed to your blog yet and therefore do not exist! Although if you are a crazy perfectionist and control freak and need to set it up BEFORE you get your first subscriber, then by all means, go create a list, call it “test subscriber list”, and add yourself to it. Then see if you get your next blog post in the mail.
That’s what I did. Because I am that control freak.
Anyway, after you’ve selected your list, click “Next” (lower right hand corner, remember?)
On the next page, they ask you if you want to send to your entire list or a segment of that list.

If you don’t have any idea what they are talking about, select “Entire list”. Otherwise, choose another option and select the segment you wish to receive your blog posts.
And then guess what? You click “Next”. This will take you to:
Campaign Info
Make sure each field below is filled out. It may already be completely filled in for you, which you won’t have to do anything, unless you want to change any of the defaults.
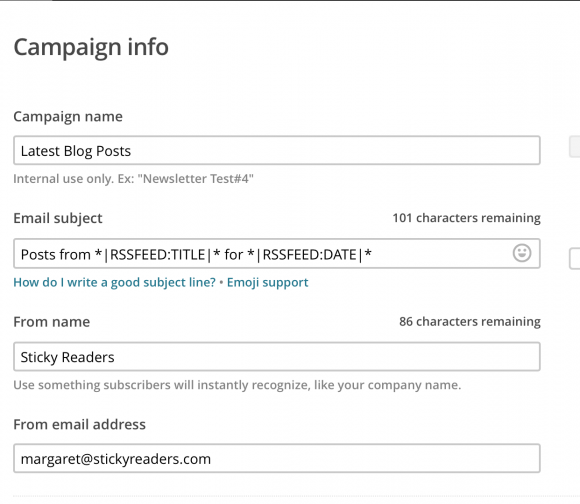
The email subject by default contains a couple of “merge tags” that will populate when it’s time to send the email.
*|RSSFEED:TITLE|* displays the title of the RSS feed.
*|RSSFEED:DATE|* displays the publish date of the feed.
There are many different merge tags at your disposal.
For example, the *|RSSITEM:TITLE|* merge tag can be used in the subject line of your RSS Campaign to pull in the title of your most recent blog post. Here’s the merge tag cheat sheet from MailChimp.
The above example for my Sticky Readers blog will produce a subject line that says:
“Posts from Sticky Readers for [whatever the publish date is]”.
The “From email address” in the last entry is the email address that your subscribers will see in the “from” area and if they reply to it, it will go to this “from” email address.
Click Next.
Select a Template
This is the “Select a Template” page. For super basic simple I-don’t-have-time-for-this template, click on the first “basic” theme.
![]()
Click Next!
Design Page

A lot of this is self-explanatory if you read everything on the page.
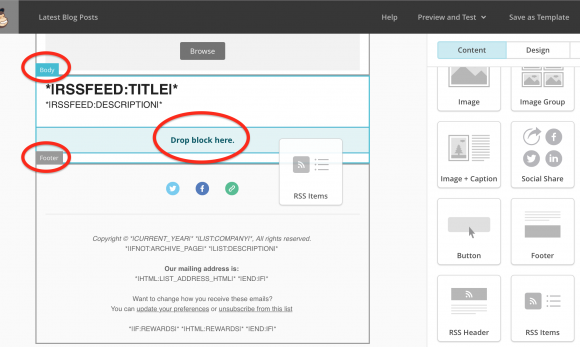
However for the quick and dirty minimum, hover over where it says, “It’s time to design your email” and click on the trash can to delete it, since you don’t need it.
Then scroll down through the list of design elements on the right-hand side until your see RSS Header and RSS Items. Drag and drop one of each onto the left hand side, making sure you place them in the Body area, ABOVE the footer area. When you start to drag an element over, the different sections (i.e. header, footer, body) will appear for you to properly place them.
Preview RSS Campaign
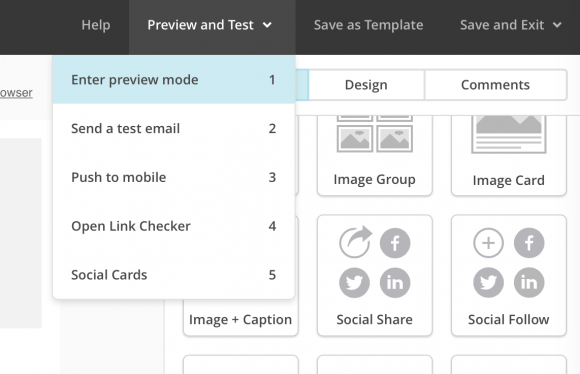
To preview what your email campaign will look like, press the number “1”. If that doesn’t work, click on “Preview and Test”, and then select “Enter Preview Mode”.
Here is what mine would like in all its bare bones:
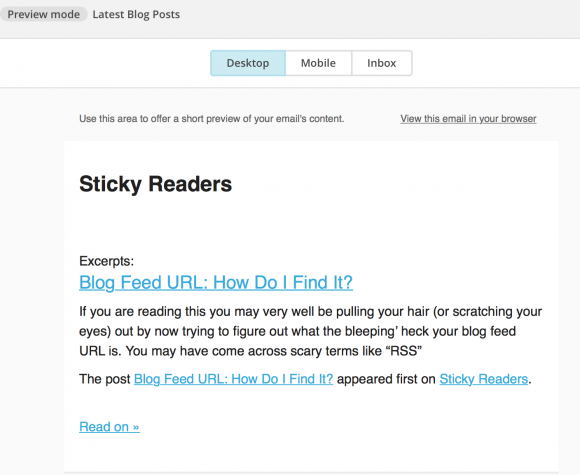
At this point you could save and turn it on just like this. If you want to add more things, change the design, play around with the different things. Keep in mind that you can flip around to all the different pages by selecting any one of them along the bottom bar (e.g. template, setup, design, etc.)

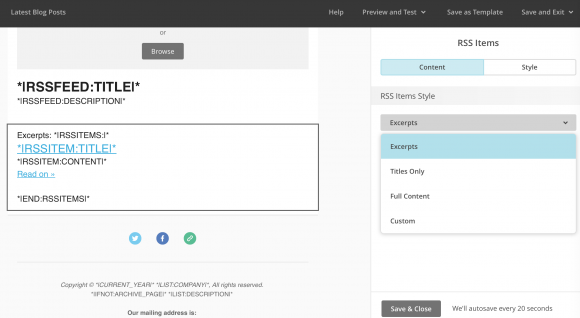
One other change I might make to the above is to publish the entire blog post in the email. The default is to simply send an excerpt, but this requires your reader to click over to your blog, which YOU might like, but they won’t. People are lazy and don’t want to click one more time. Seriously. That extra click is too much for them.
So on the Design Page, click on the RSS Items block. On the right-hand side, click on the RSS Items Style drop down and select Full Content.
Change Preview Line
One more thing! If you don’t want to look like an amateur, click on the little line at the very top of the email design and change the text to say something more meaningful, like “Check out our latest news!” or “Eat More Vegetables”. You do this by clicking on the area and changing the text in the edit box on the right hand side of the page.

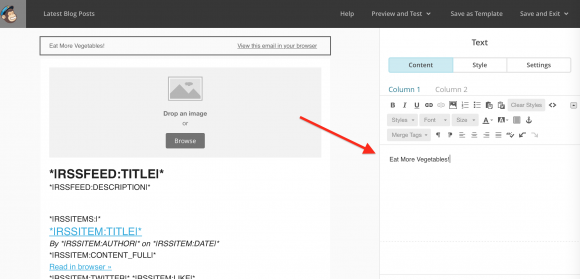
This is the line people will sometimes see in their email preview programs.
Click Save & Close.
You can preview it again if you wish to see how it will display the entire blog post.
You can also (and probably should) send a test email to yourself.
But, when you’re ready, click on NEXT.
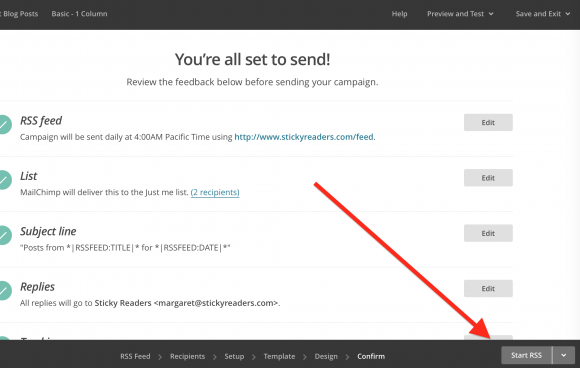
Review the items (it will alert you of any errors). To kick off your campaign, click on the Start RSS button at the bottom.
Woo hoo!
Now go blog to your heart’s content and if you have questions, don’t hesitate to ask them in the comments below.
Thanks! This was helpful! I use Mailchimp but hadn’t quite figured out how do use it with my RSS yet.